21 Bathroom Cabinet Organization Ideas That Keep Everything Tidy
Bathroom cabinets are among the hardest spaces in any home to keep organized — not because organization is conceptually difficult but because the bathroom’s specific conditions work actively against it. Humidity causes paper labels to peel, products expire at uneven rates and accumulate as a result, the under-sink cabinet has plumbing that interrupts any standard storage system, and the sheer variety of product shapes and sizes — tall shampoo bottles beside small blush compacts beside flat prescription boxes — makes a single uniform storage approach impossible.
The systems that actually last in bathroom cabinets are those designed around the bathroom’s real constraints rather than the ideal one: a system that fits around the pipes, uses materials that withstand moisture, prioritizes the items used most frequently, and requires no more than ten seconds to restore after daily use. These 21 ideas work through every bathroom cabinet type — under-sink, medicine cabinet, vanity drawers, and auxiliary storage — with the practical specificity that makes the difference between a system that holds for years and one that reverts to disorder within a month.
1. Empty and Edit Before Buying Any Organizer

The most consequential step in any bathroom cabinet organization project happens before a single bin or basket is purchased. Pulling out everything in the cabinets and tossing expired and unusable items first creates space that no organizer can manufacture — and the space gained by letting go of unused products is often more valuable than any organizational solution applied to what remains.
In practice: remove every item from every cabinet, group what remains by category (skincare, hair tools, dental, medications, first aid, cleaning supplies, backup stock), discard anything expired, anything empty, and anything that belongs somewhere else in the house. Donate unopened products that won’t be used. Only after editing down to the genuine current inventory does the organizer selection make sense — because the system should be sized for what’s actually staying, not for everything that was in the cabinet before.
2. Map Zones Before Choosing Containers

The second decision before buying anything: assign each category of bathroom cabinet contents to a specific location based on frequency of use. Daily-use items — the products reached for every morning and evening — belong at the front of the most accessible shelf or drawer. Weekly-use items can sit behind the daily zone or on a secondary shelf. Backup stock, seasonal products, and rarely used items can occupy the least accessible positions: the back of the under-sink cabinet, the highest medicine cabinet shelf, or a secondary storage location outside the bathroom entirely.
This zone map determines which organizers are needed and in what sizes before a single purchase is made. A zone for daily skincare at front-of-vanity-drawer level needs shallow bins sized to that category’s specific product dimensions; a backup stock zone in the back of the under-sink cabinet needs a bin with enough depth to stack travel sizes and refills without individual retrieval. Countertops become cluttered with daily essentials when no clear designation exists for daily versus backup supplies — the solution is designating homes for daily essentials versus backup supplies, with backups moved to another space like a linen closet.
3. Design Around the Pipes in an Under-Sink Cabinet

The under-sink cabinet is the most commonly organized and most consistently frustrating bathroom storage zone precisely because its central obstacle — the drain pipe and supply lines — is non-negotiable. Standard rectangular bins and boxes placed without accounting for the pipe’s position create a cabinet where half the storage space is technically present but practically inaccessible behind or around the plumbing.
Rather than trying to awkwardly cram in bins and baskets, look for a shelving unit that’s designed to fit around pipes — U-shaped shelf units and C-shaped organizer configurations are specifically designed to work with standard under-sink plumbing. Measuring the pipe’s location (its distance from the back wall, its height from the cabinet floor) before purchasing any under-sink organizer ensures the system will actually fit. The two zones created by the pipe — one on each side of the drain — should each receive their own organizer appropriate to the space available in each zone.
4. Use a Two-Tier Sliding Shelf Organizer to Double Under-Sink Capacity

Slideout storage means never losing another bottle to the depths of an under-sink cabinet again — baskets on a two-tier organizer slide out for easy access, and the stacked design makes use of vertical space while dividers keep items orderly and categorized.
The key distinction between a two-tier sliding system and a standard two-tier shelf: the sliding function. A fixed shelf that requires reaching over the front tier to access the back tier reproduces the depth problem in vertical form. A pull-out configuration brings everything to the front of the cabinet opening in one motion, which is the difference between a system that gets used correctly and one that accumulates clutter in the back because it’s easier to reach past the organizer than to properly replace items within it.
5. Place a Lazy Susan in the Under-Sink Cabinet for Corner Access
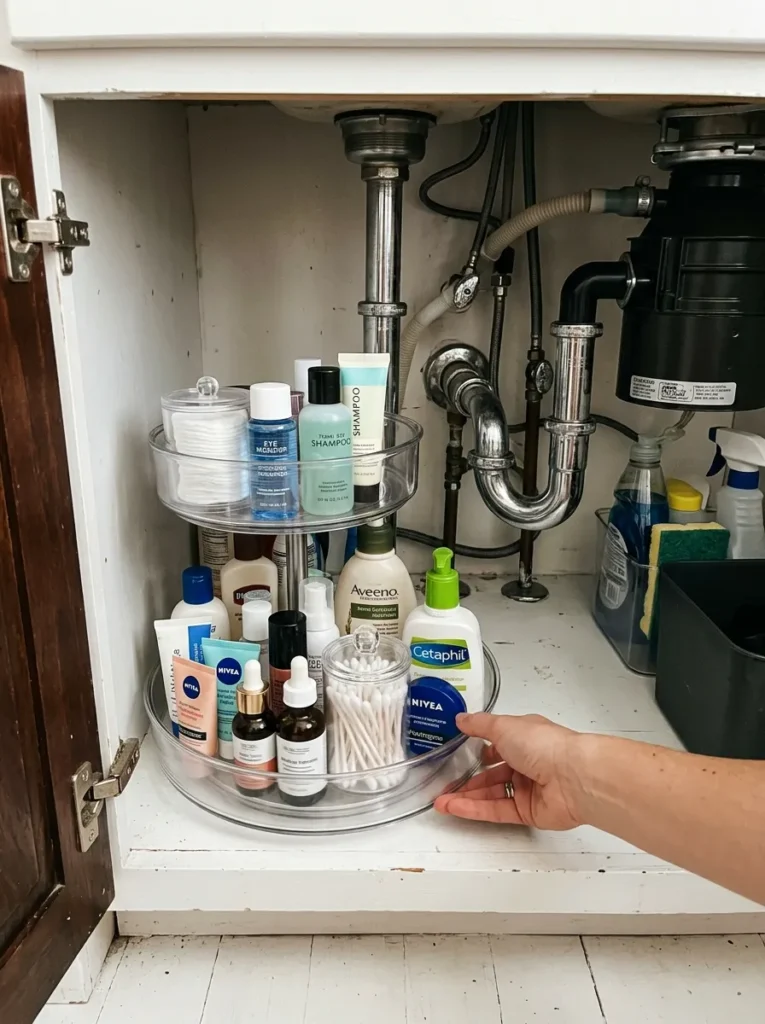
In under-sink cabinets where the plumbing allows for reasonable floor area on at least one side, a turntable lazy Susan transforms the deep, hard-to-reach back corners into accessible storage. A single rotation brings the back of the cabinet to the front without any reaching or searching — which is the standard that makes a bathroom cabinet genuinely functional rather than merely organized.
The lazy Susan works particularly well for smaller, frequently used items — cotton rounds, travel-sized products, small bottles — that tend to migrate to the back of a cabinet and disappear. The turntable should be sized to the available floor area without extending past the pipe on the relevant side. A two-tier version adds vertical capacity without requiring additional floor footprint, which is the right approach in under-sink cabinets where floor space is already constrained by plumbing.
6. Use a Tension Rod to Create Vertical Storage for Spray Bottles

Cleaning spray bottles stored upright in the under-sink cabinet occupy a disproportionate amount of floor area relative to their actual volume and make everything stored around them less accessible. A tension rod — the same spring-loaded rod used for curtains — mounted horizontally inside the cabinet at a height that matches the spray bottle trigger creates a hanging system where the bottles hang from their triggers on the rod, storing vertically with their nozzles up and their bottle bodies suspended rather than occupying floor space.
This frees the entire cabinet floor for other storage while keeping the spray bottles immediately accessible. Two bottles typically fit on a standard tension rod in a 24-inch cabinet; three to four fit in a 36-inch cabinet. The rod’s height from the cabinet bottom should allow the bottle body to hang freely without the bottom touching the shelf — approximately 10 to 12 inches from the floor for most standard spray bottles.
7. Use Clear Bins With Labels in Vanity Drawers for Visible Organization
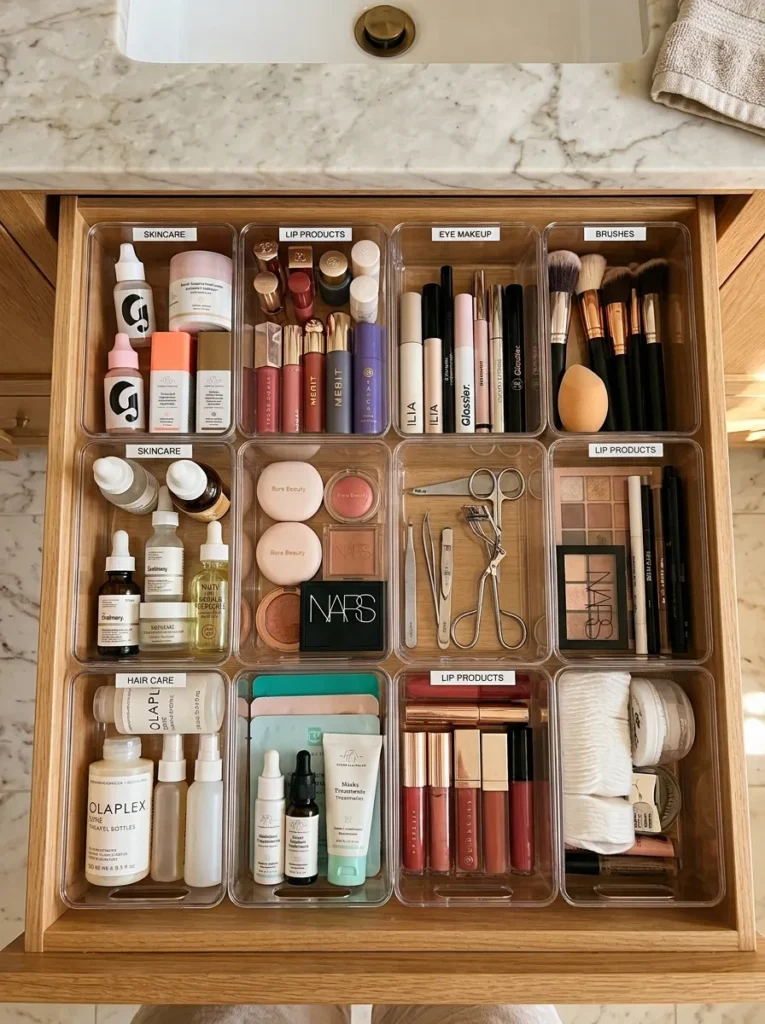
Bathroom vanity drawers accumulate in a specific way: items get placed rather than stored, no zone distinction exists between morning and evening products, and retrieving one item displaces others so the drawer requires tidying after every use. Clear bins of matched sizes, placed within the drawer in a grid arrangement with each bin assigned to one category, solve this by making every item visible without touching anything else and by creating a return position that’s as easy to use as the retrieval position.
Labeling bins with waterproof vinyl labels helps everyone in the household remember where everything goes and makes reorganization easier when categories shift. Labels on bathroom bins serve the same function as labels in any organizational system — they convert the organization from a personal memory exercise into a shared household system that anyone can maintain. The bin material for bathroom drawers should be moisture-tolerant — acrylic, coated wicker, or wipeable plastic — rather than raw cardboard or untreated wood that deteriorates in humidity.
8. Mount an Organizer on the Interior Cabinet Door

The interior face of a cabinet door is one of the most consistently overlooked storage surfaces in any bathroom cabinet. In the space between the closed door and the nearest shelf, there’s enough depth for a shallow organizer — a wire rack, a pocketed hanging organizer, or a series of adhesive hooks — that holds flat items, small containers, or frequently needed tools without any shelf or floor space.
Adhesive organizers applied to the inside of cabinet doors utilize vacant interior space and work especially well for the daily essentials that need to be immediately accessible without opening the main cabinet contents. Door-mounted organizers suit specific product types: hair ties, bobby pins, small makeup brushes, floss picks, lip balms, and similar small flat items that tend to scatter across drawer bottoms. The door’s depth clearance — the space between the door face and the shelf front when closed — limits the organizer’s projection; most under-sink and vanity cabinets have 3 to 4 inches of usable door clearance.
9. Attach Command Hooks Inside Cabinets for Hair Tool Storage

Hair tools — blow dryers, flat irons, curling irons — are among the most spatially awkward bathroom storage problems because their cords make standard bins impractical and their dimensions don’t match any shelf system cleanly. Hanging Command hooks inside bathroom cabinets holds hair tools and other small accessories up and out of the way, freeing up shelf space for other items.
Two large command hooks inside the under-sink cabinet door or side wall — one for the blow dryer body and one for the cord — keep the tool accessible, completely stored, and off every horizontal surface. The hooks should be positioned to hold the tool without the cord touching the cabinet bottom, which avoids the tangled-cord problem that makes freestanding storage frustrating. Heat-resistant command hook versions should be used for tools that retain heat after use; standard adhesive versions suit non-heating tools and accessories.
10. Sort the Vanity Cabinet by Person in Shared Bathrooms

In a shared bathroom vanity with two doors or two drawers, the clearest organizational system assigns one cabinet or drawer section to each person rather than organizing by product category across the full cabinet. Each person’s products in their dedicated zone means no negotiation about what goes where, no question about whether a product belongs to the household or to one person, and no shared zone that requires collective maintenance.
The zone division works at both the physical and the system level: each person’s zone has the same organizational approach (clear bins, labeled categories) but contents that are entirely their own. When one person’s zone gets disorganized, it affects only their section — the other person’s system remains intact. This is the most durable organizational approach for shared spaces because it requires only individual rather than collective compliance to maintain.
11. Organize the Medicine Cabinet by Category, Not by Brand

The medicine cabinet’s default state — a shelf where products arrived and stayed in no particular order, different brands of the same product category separated, running-out products beside full ones — fails because there’s no retrieval logic that makes finding anything fast. Organizing by category (all pain relievers together, all cold and flu medications together, all first aid items together, all dental products together) converts the medicine cabinet from a storage zone into a functional dispensary where the right product is found in one look rather than one search.
Using clear plastic bins and canisters to organize medicine cabinet contents corrals pills, liquids, and ointments into designated storage — clear walls provide visibility so you can monitor supply levels and be aware of when to restock. Category bins in the medicine cabinet also make expiration date management more visible: when all pain relievers are in one bin, a weekly glance across that bin’s contents catches expired products before they accumulate. Check and discard expired products on a consistent schedule rather than waiting for an organization reset.
12. Use Stackable Acrylic Drawers Inside the Medicine Cabinet

A medicine cabinet with fixed shelves at fixed heights often doesn’t match the height range of the products being stored: tall prescription bottles don’t fit under the standard shelf above them, flat compacts don’t use the full shelf height, and the resulting arrangement alternates between wasted vertical space and products that physically don’t fit where they need to go.
Stackable acrylic drawers — mini drawer units sized to fit within a medicine cabinet shelf section — convert fixed shelf space into variable-height drawers where each drawer holds one category and can be pulled forward for access without touching other drawers. The drawer format also prevents the cascade effect of fixed cabinet shelves where reaching for one item at the back displaces everything between it and the front. The acrylic material suits bathrooms specifically because it’s transparent (contents visible without opening), moisture-resistant, and easy to wipe clean.
13. Reserve the Top Medicine Cabinet Shelf for Prescription Medications

Prescription medications need two specific storage conditions that most medicine cabinets provide inadequately by default: they need to be secure from children and visible enough that doses aren’t missed. Dedicating the top medicine cabinet shelf — the hardest for young children to reach — exclusively to prescription medications creates a consistent, memorable location for the household’s most important pharmaceutical items and ensures the shelf isn’t occupied by miscellaneous products that displace medication when space is tight.
Using peel-and-stick or chalkboard labels to designate contents — prescriptions, pain relievers, supplements, first aid — keeps bottles and medication containers properly identifiable and saves the headache of fumbling with mystery containers. The top shelf should be viewed as a pharmacy zone rather than a general overflow area: only prescription medications, supplements taken on medical recommendation, and the most critical first aid items belong there. Everything else in the medicine cabinet should be organized in a way that never encroaches on this reserved zone.
14. Add a Magnetic Strip Inside the Cabinet for Small Metal Items
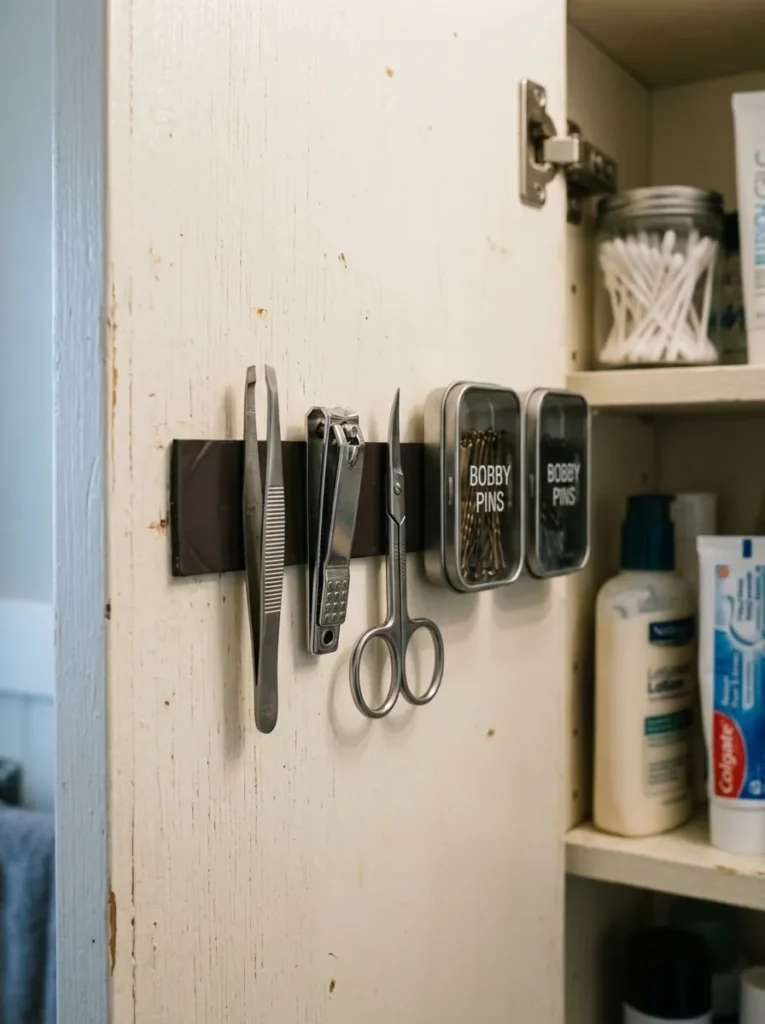
A thin magnetic strip mounted horizontally on the interior side wall or door face of a bathroom cabinet holds small metal items — nail clippers, tweezers, a small pair of scissors, bobby pin containers, and metal hair clips — at the cabinet’s side or door surface rather than loose in a drawer where they slide and accumulate at the bottom. The magnet holds each piece visibly and individually, which means any specific tool is found at a glance rather than rummaged for.
The magnetic strip should be the thin, self-adhesive variety used in office organization rather than a heavy-duty bar designed for tools — bathroom items are light enough that standard magnetic organization strips provide adequate hold. The strip’s position on the side wall or door should keep it within the cabinet’s depth clearance without the mounted items projecting into the cabinet interior’s usable space. This works particularly well in narrow medicine cabinet side walls that have no shelf space but ample vertical surface.
15. Install a Pull-Out Trash Bin Inside the Under-Sink Cabinet

The under-sink cabinet is the natural zone for bathroom waste management — proximity to the area where packaging is opened, products are used up, and waste is generated makes it the logical home for a small concealed trash bin. A pull-out trash bin mounted on the cabinet door’s interior or on a sliding track at the cabinet floor eliminates the exposed plastic bin that most bathrooms currently have sitting on the floor, which collects debris around its base and makes floor cleaning more difficult.
The pull-out mechanism should be sized to the available door or floor space rather than the largest bin that could theoretically fit — a bin that’s too wide prevents the door from closing properly, and one that’s too deep collides with the shelf behind it. A small liner bag inside the bin makes emptying clean and replaces the need for a separate waste bag storage solution. For bathrooms shared by multiple people, a slightly larger pull-out bin on a floor track rather than a door mount provides better daily capacity.
16. Use a Tiered Shelf Organizer for Under-Sink Vertical Space
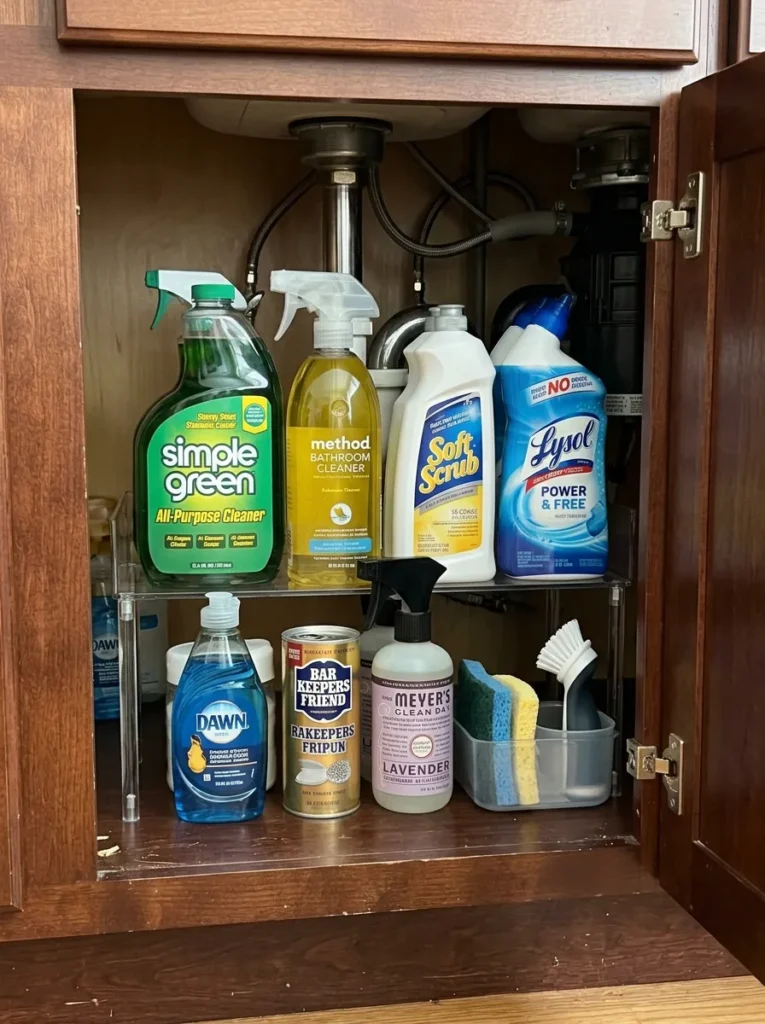
The standard under-sink cabinet floor is one flat level of storage where items stack on each other rather than being organized in accessible tiers. A tiered shelf organizer — a two or three-step riser placed at the back of the cabinet — creates multiple height levels within the same footprint, making the items at the back visible and accessible from the front without moving what’s in front of them.
The tiered arrangement works best when taller items are placed on the lower tiers (at the back) and shorter items on the higher tiers (also at the back), so that every item’s top is visible from a standing viewing angle at the open cabinet. This riser approach is particularly effective for the under-sink cabinet’s backup stock zone — the section that holds refill products and extra supplies — where the primary organizational challenge is making the back of a deep cabinet genuinely usable.
17. Organize Bathroom Drawers With Adjustable Bamboo Dividers

Bathroom vanity drawers without internal dividers accumulate in the same way as kitchen junk drawers: items are placed rather than organized, the drawer’s contents shift with every open-close cycle, and what was once organized becomes undifferentiated clutter within weeks. Adjustable bamboo dividers — the spring-loaded variety that press against the interior walls without screws or adhesive — configure the drawer into sections sized to the actual product categories stored in it.
Bamboo is the preferred divider material for bathroom drawers specifically because it’s moisture-resistant, doesn’t slide as readily as plastic dividers on a lacquered drawer bottom, and looks intentionally curated when visible through an open drawer. The section widths should be set for the actual product categories rather than equal thirds: a wider section for makeup products in full-size packaging, a narrow section for pencils and lip liners, a medium section for skincare items. The drawer’s daily-use products go in the front section; less frequently used items in the back section.
18. Create a Dedicated Makeup Drawer With Individual Product Slots

A bathroom drawer dedicated entirely to makeup — with individual slots or small cups sized to specific makeup categories — converts the morning routine from a rummage into a system. Lipsticks in one section, pencils and liners in a pencil cup, palettes flat in a wide slot, foundations and concealers in a grouped section, brushes in a brush holder — each category has an assigned position and returns to that position after use.
The organization should be built around the makeup routine’s sequence rather than an alphabetical or aesthetic arrangement. The first products used in the morning routine go at the front-left (or whichever hand reaches first); the finishing products go toward the back. This sequence-based arrangement means the routine runs forward through the drawer in the same direction the routine runs in time, which makes the system intuitive enough to maintain without active effort.
19. Mount a Slim Rollout Cabinet Between the Vanity and Wall

In bathrooms where the vanity has a narrow gap between its side and the adjacent wall — even a gap as small as 3 to 4 inches — a slim rollout cabinet (a rolling tower of narrow shelves designed for exactly this gap) converts what is effectively dead space into a useful storage column. These slim rollout units, sized in 3- to 6-inch widths, hold flat items: hair tools, flat-fold towels, rolled washcloths, cleaning products, and boxes of bathroom supplies that are too wide for a medicine cabinet but don’t need under-sink depth.
The rollout function is essential to the system’s usability — a fixed narrow cabinet in this position would require sideways reaching to access anything more than one item deep. Rolling the unit out provides full front-facing access to every shelf. The unit’s height should reach the underside of the counter rather than being significantly shorter, so the space above a shorter unit doesn’t become an additional clutter zone.
20. Use the Space Above the Toilet Tank for Auxiliary Cabinet Storage
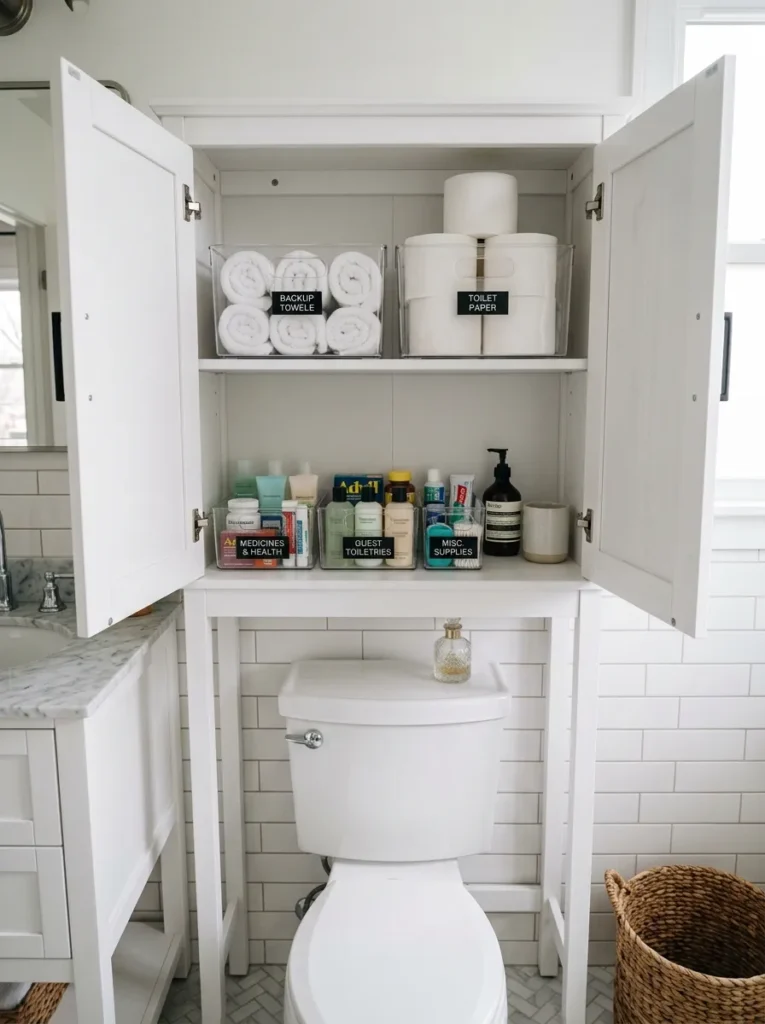
The wall above the toilet tank is bathroom storage territory that most bathrooms leave completely unused or style with purely decorative elements. An over-toilet cabinet — a freestanding or wall-mounted unit that positions shelves above the tank — adds genuine enclosed storage capacity at no floor cost in what is consistently the least used floor zone in a bathroom.
The organizational logic for an over-toilet cabinet differs from under-sink or vanity storage because the access angle is less immediate: this is the right home for backup stock, seasonal items (sunscreen bought for summer, extra cold medication for winter), linens in rotation, and the category of items that need accessible storage but don’t need daily reach. Clear bins or labeled baskets inside the over-toilet cabinet make the stored items identifiable without removing each item to see what’s behind it.
21. Photograph Each Cabinet After Organizing as a Reset Reference

The maintenance step that most bathroom organization projects skip: immediately after completing each cabinet, take a photograph of the organized interior from directly in front of the open door. This creates a visual reset reference — what the cabinet looks like when it’s working — that makes restoring the system after drift significantly faster than reorganizing from memory or from scratch.
In households with multiple family members sharing bathrooms, the reset photograph serves as a shared reference point that removes ambiguity about where things go. A photograph of the under-sink cabinet taped to the inside of the door gives every household member the same information without a conversation. The photograph also reveals over time whether the system is working — if resetting the cabinet to the photo requires significant repositioning rather than minor adjustment, the system probably needs revision rather than just a tidy.
The Sequence That Makes Bathroom Cabinet Organization Stick
Most bathroom cabinet organization fails not at the setup stage but at the maintenance stage — the system is created once, looks perfect for a week, and gradually reverts. The reason is almost always that the initial system was too complex to maintain at the speed of daily use.
The systems with the highest longevity share a few consistent properties: every item has a clearly assigned location that can be restored in one or two movements, not five; the zones are broad enough that imprecise returns still count as organized; and the containers are simple enough that a household member who didn’t organize the system originally can maintain it without instructions.
Before starting: edit first, zone second, buy containers third. In that sequence, the containers are sized and styled for what’s actually staying, not for a theoretical ideal. Out of that sequence — buying beautiful organizers before editing and zoning — produces bins that don’t fit the products, systems that store everything including what should have been discarded, and a cabinet that looks organized for the first week and cluttered by the end of the month.
Final Thoughts
Bathroom cabinet organization that actually lasts is built on two principles: the right system for the right space, and a reset that’s fast enough to happen automatically after daily use. The ideas here cover every bathroom cabinet type — from the pipe-complicated under-sink cabinet to the medicine cabinet to the vanity drawer to auxiliary storage in small bathrooms — with enough practical specificity that each solution can be applied to the actual dimensions and constraints of a real bathroom.
Start with the cabinet that creates the most daily friction — the one you open and close ten times a day and find frustrating each time. Edit it, map zones, and choose one or two targeted solutions from the ideas here before moving to the next cabinet. One cabinet organized well and maintained consistently is more valuable than five cabinets reorganized simultaneously and drifting back within a month.
Save the ideas that match your bathroom’s specific cabinet types and return to this guide as each storage zone gets its turn.