20 Bathroom Niche Ideas That Add Smart Storage
A bathroom niche — a recessed shelf built directly into the wall — is one of the few storage solutions that adds function without claiming any floor space, visual weight, or usable room width. In a bathroom where every inch matters, a well-placed niche in the shower, beside the tub, or in a vanity wall clears the counter, eliminates the plastic caddies hanging from the showerhead, and gives the room a built-in, considered quality that surface-mounted shelving rarely achieves.
Done well, a niche is invisible as a practical object and visible as a design detail. Done poorly — placed too close to the showerhead where it collects spray, too shallow for the bottles that actually live in your shower, or on an exterior wall where it compromises insulation — it creates problems that are expensive to fix once tiling is complete. The planning decisions matter as much as the visual ones.
These 20 ideas cover the full range: single and double shower niches, horizontal and vertical formats, accent-tiled and seamless varieties, lit niches, niches beside the tub, niches in the vanity wall, and the practical details — placement height, depth, waterproofing, tile alignment — that determine whether a niche works as well as it looks.
1. Place the Niche on an Interior Wall, Not an Exterior One

Before any design decision is made, the niche location must be confirmed as structurally appropriate, and the most consistent planning mistake is attempting to cut a niche into an exterior wall. Exterior walls in most U.S. homes contain insulation between the studs, and cutting a niche cavity removes that insulation from the section it occupies. In colder climates, this creates a thermal bridge that can cause condensation inside the wall cavity, which leads to moisture damage and mold over time — a consequence that often doesn’t appear until the wall needs to be opened up.
Interior walls between the bathroom and an adjacent room or hallway are the correct target for most niches. They have no insulation to compromise, the framing is accessible between standard 16-inch stud bays, and any moisture that reaches the stud cavity behind the niche can dissipate without the trapping effect that insulation creates. Confirm the wall is interior and non-load-bearing before planning any niche into it, and verify stud locations with a stud finder before purchasing any prefabricated insert.
2. Set the Niche Height at Chest Level for a Shower Shelf

Niche height in a shower is the second foundational decision, and it’s one that’s more consequential than it sounds. A niche set too low requires bending to retrieve items; one set too high requires reaching past eye level. The general guideline most installers follow places the bottom of the niche at approximately 42 to 48 inches from the shower floor — chest height for most adults — which positions the shelf contents at comfortable reach without awkward bending or stretching.
For a two-person household with significant height differences, a two-niche arrangement at different heights — one at 42 inches for the shorter user, one at 54 to 60 inches for the taller — solves the reach problem more effectively than a single niche at a compromise height. The showerhead spray direction also matters: the niche should be positioned far enough from the showerhead that it doesn’t sit in the direct water path, which causes items to be constantly doused and accelerates soap scum buildup inside the niche.
3. Size the Niche Depth for Modern Bottle Heights

Niche depth — the distance from the tiled face to the back wall of the recess — determines whether the products you actually own will fit or tip forward and fall. This is a planning detail that matters more now than it did a decade ago: pump-format shampoo and conditioner bottles, body wash dispensers, and wide-based soap dishes are all significantly taller and deeper than the products of earlier eras. A niche with a finished depth of 3 inches or less leaves most modern pump bottles too tall to stand upright; a finished depth of 4 to 5 inches (approximately 90 to 120 millimeters) accommodates most standard bottles securely.
The finished depth is determined by the wall framing. Standard 2×4 framing leaves approximately 3.5 inches of cavity depth; with tile backer board and tile on the back wall consuming another half to three-quarters of an inch, the finished interior depth is typically around 3 inches. A 2×6 framed wall provides closer to 5 inches of finished depth, which accommodates a much wider range of product sizes. If the shower wall is 2×4 framing and deeper storage is needed, extending the niche slightly into the adjacent room’s wall — adding a bump-out on the other side — is an option some contractors can accommodate.
4. Install a Horizontal Niche for a Long, Low-Profile Storage Run
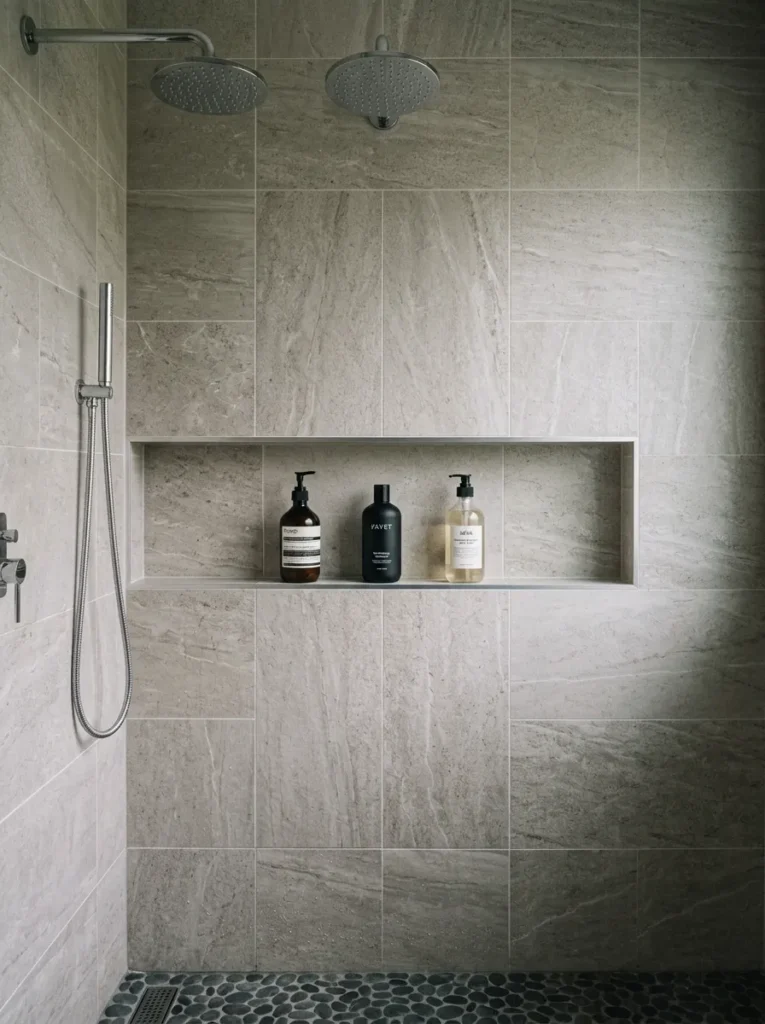
A horizontal niche — one that runs significantly wider than it is tall — integrates with the shower wall in a way that reads as architectural detail as much as storage. Rather than a box embedded in the tile, a long horizontal slot creates a linear element that references the shelf-like quality of a built-in feature and gives the shower wall a visual horizon line.
The practical limitation of a wide horizontal niche is framing: a niche that spans wider than the space between two studs requires cutting through one or more studs and installing a structural header above to maintain wall integrity. This is work that should be done by a contractor with building code awareness rather than as a DIY project, since cutting load-bearing framing elements without proper reinforcement compromises the wall. For a niche that fits within a single stud bay — approximately 14.5 inches between 16-inch on-center studs — horizontal niches can be framed with top and bottom blocking only, which is a considerably simpler installation.
5. Use a Stacked Double Niche for Shared Showers
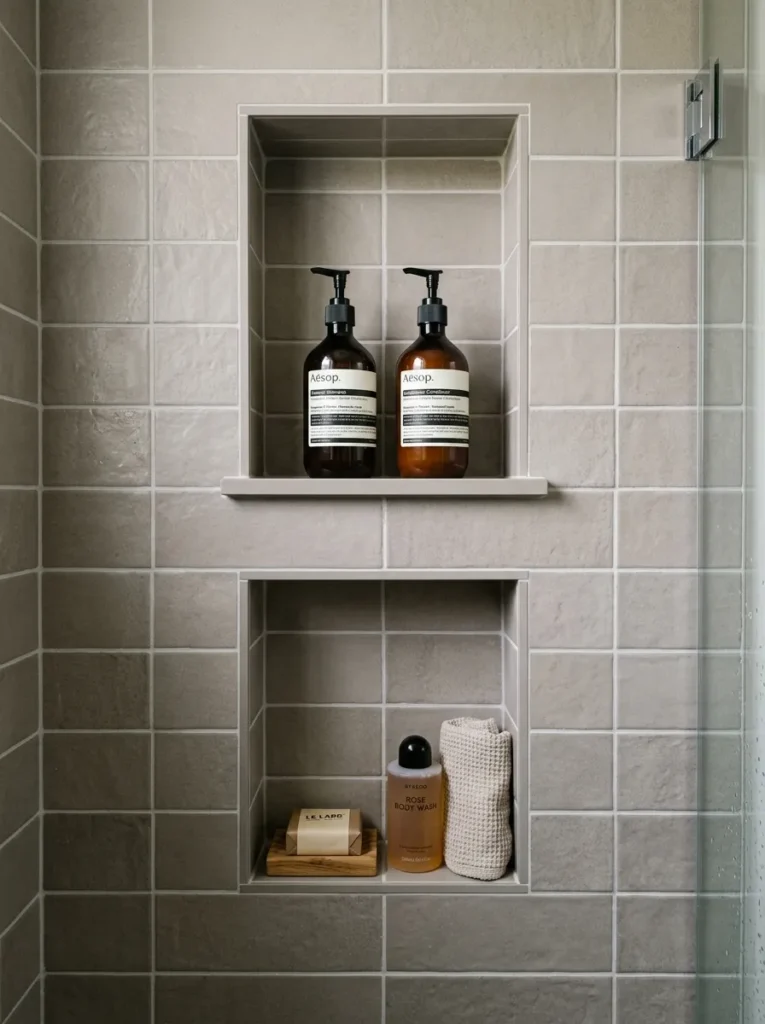
Two niches stacked vertically — one above the other in the same wall position — double the storage capacity without requiring additional wall real estate, and they introduce a natural organizational division in a shared shower: one niche for each person’s products, or a natural separation between shampoo and conditioner above and body wash and soap below. This is particularly useful in showers shared by two people who haven’t found a comfortable way to co-inhabit a single shelf.
The visual effect of a stacked double niche is also stronger than a single one: the two openings create a composed, symmetrical element in the wall that reads as a deliberate design detail rather than a single embedded box. The shelf dividing the two niches can be a tiled ledge, a glass shelf, or a solid surface shelf in a contrasting material — stone, marble, or solid teak — that adds material interest at the most visible horizontal surface in the niche arrangement.
6. Tile the Niche Interior in an Accent Material to Define the Recess
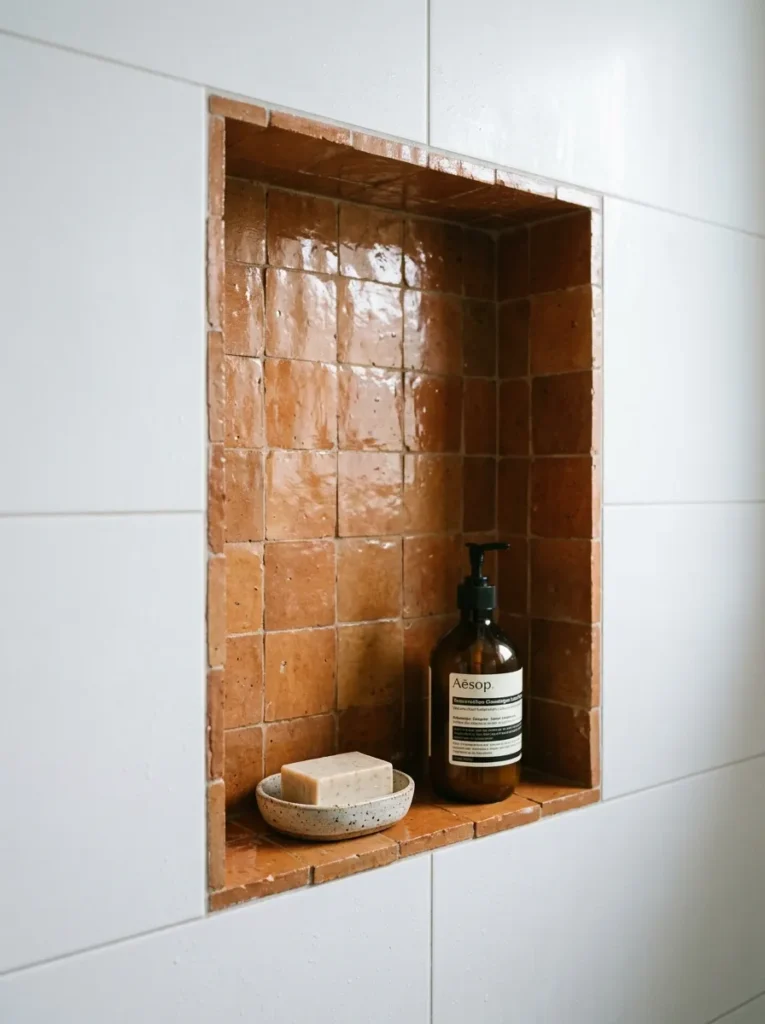
One of the most visually effective niche treatments covers the interior surfaces — the back wall and the two side walls inside the recess — with a different tile or material than the surrounding shower wall. This creates a framed, picture-like quality where the niche reads as a deliberate opening into a different material layer rather than simply a hole in the existing tile.
The accent material can be as subtle or as bold as the overall bathroom’s design register. A shower tiled in large-format white porcelain might use small zellige tiles in a warm cream inside the niche — same palette, different texture and scale. A bathroom in a stronger design direction might use a contrasting mosaic, a veined marble slab cut to size, or a deep charcoal tile that creates a tonal frame. The key design principle: the niche interior should relate to the surrounding material through color or material family even when it’s clearly distinct from it.
7. Match Niche Tile to the Shower Wall for a Seamless Integrated Look

The alternative to an accent-tiled niche is one where the interior tile is identical to the surrounding wall tile — same size, same color, same grout — so the niche reads as a recess in the surface rather than a separate element. This approach suits bathrooms where the design intention is restraint and material consistency, and where the niche is meant to function without drawing visual attention to itself.
The execution requires careful planning at the tile layout stage, before installation begins, so that the tile courses on the niche interior align precisely with the courses on the surrounding wall. Tile that steps out of alignment between the niche interior and the outer wall breaks the seamless effect and makes the niche look like an afterthought even when the material is identical. This alignment must be calculated before any tile is set, which is why planning the niche location before selecting tile — or at minimum, coordinating the two simultaneously — produces significantly better results than deciding on the niche after tiling has begun.
8. Use a Bold Mosaic Tile Inside the Niche as a Design Focal Point
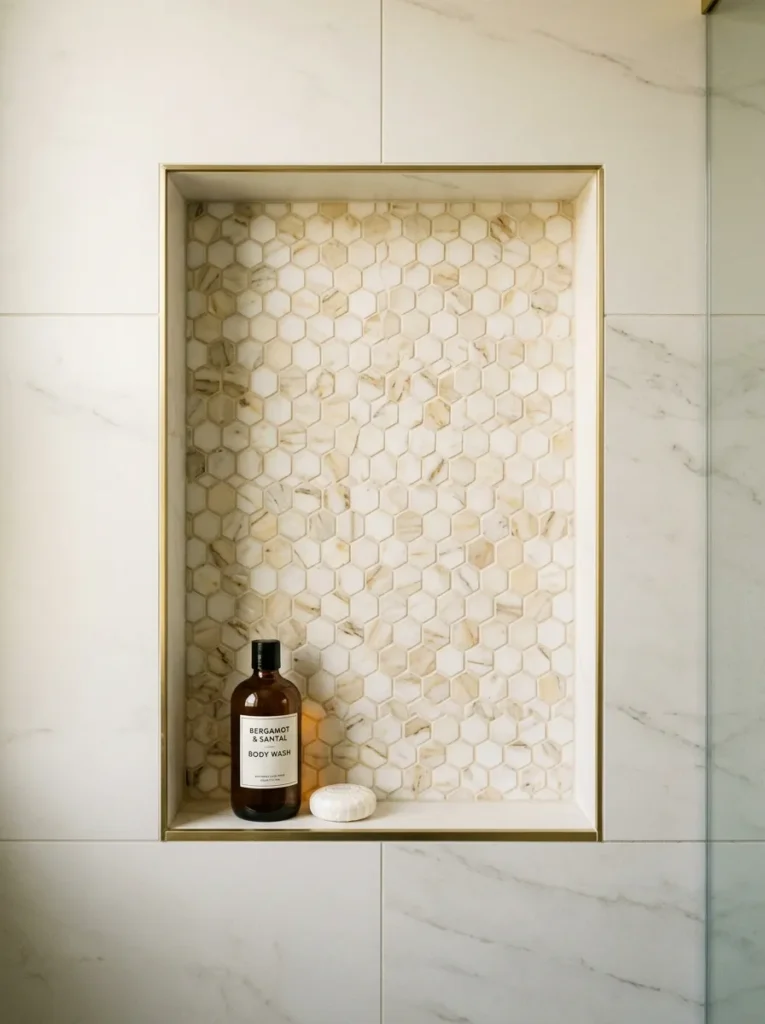
For bathrooms designed to have a clear focal point in the shower, the niche back wall is one of the highest-impact positions for a statement tile choice. A mosaic in a distinctive color, pattern, or material — small hexagonal marble tiles, a handmade ceramic in a rich color, a glass mosaic that catches the light — fills a contained area rather than requiring the investment of covering a full wall, and it frames the functional contents of the niche in a way that makes even ordinary shampoo bottles look like they’ve been arranged rather than simply placed.
The size of the mosaic tile relative to the niche matters: very small mosaics inside a large niche create a rich, jewel-like effect; larger-format tiles inside a small niche may not have room to display their full pattern. The back wall of the niche receives direct viewing attention from the shower’s primary standing position, which makes the tile choice there more consequential than an equivalent selection on a peripheral wall.
9. Choose a Prefabricated Tile-Ready Insert for Budget-Conscious New Builds
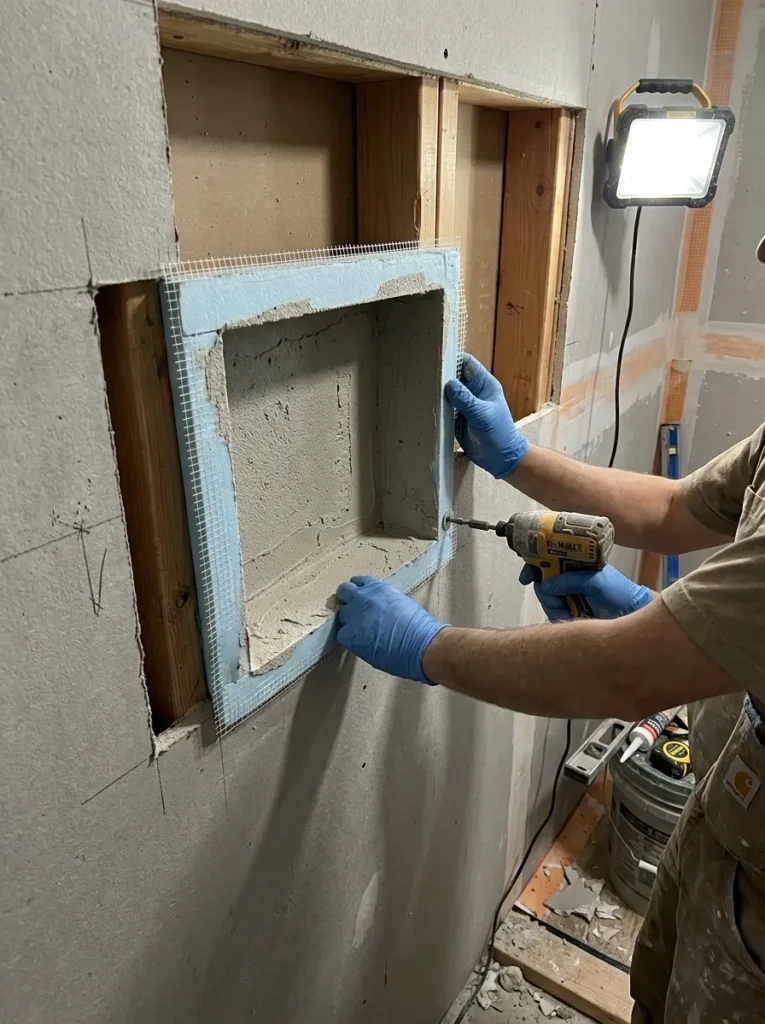
For homeowners who want the look of a built-in tiled niche without the framing and waterproofing complexity of a fully custom installation, prefabricated tile-ready inserts — foam board units pre-formed to standard sizes, designed to be set into the wall cavity and then tiled over — significantly simplify the installation process. These units come pre-waterproofed, slot between standard stud spacing, and accept standard tiles directly over their surface.
The trade-off is size standardization: most prefabricated inserts are made in standard dimensions that correspond to standard tile sizes, which limits design flexibility but produces a clean result without the expertise required for custom-built niches. For a bathroom remodel where the primary goal is functional niche storage rather than a bespoke design feature, a prefabricated insert is a practical and cost-effective option. Brands producing tile-ready foam board niches design them to work with standard shower waterproofing systems, which means the waterproofing can be fully integrated rather than relying on caulk at the perimeter as the only water barrier.
10. Slope the Niche Floor Slightly Toward the Shower to Prevent Water Pooling

A flat niche floor collects water, soap residue, and product drips — the accumulation that makes a niche shelf look grimy quickly and creates conditions for mold growth if the niche isn’t dried regularly. A very slight slope on the niche floor — tilted fractionally toward the open face so that water runs out rather than pooling inside — addresses this systematically rather than requiring constant cleaning.
This slope is built into the niche during installation, before the tile is set, by shimming or packing the niche floor substrate at the back. The slope needs to be only a few degrees — noticeable to a level but not visually apparent to a viewer — to function effectively. Prefabricated foam board inserts often come with the slope pre-formed. For a custom tiled niche, confirming with the tile installer that the niche floor is being set with appropriate drainage slope before tile is installed is the single most important quality-control step in the niche’s construction.
11. Install a Glass or Marble Shelf Inside the Niche for a Spa Quality Feel

The niche shelf — the horizontal surface inside the niche that products rest on — is usually a tiled surface matching the niche interior. An alternative that reads as more considered and more material-specific is a floating shelf in glass, marble, or solid surface material inset into the niche rather than tiled over. A glass shelf allows the back wall tile to be fully visible below it, which makes a patterned or accent-tiled niche more visually complete; a marble shelf adds material warmth that tiled surfaces typically lack.
Inset shelves should be sized to fit within the niche’s interior width with minimal gap on each side, and the surface should be set level rather than sloping. The practical consideration: a glass shelf shows water spots and residue more visibly than a tiled surface, which suits bathrooms where daily maintenance is consistent but is less forgiving in heavily used, shared showers. Sealed marble requires periodic resealing to maintain its water resistance in a shower environment.
12. Add LED Strip Lighting Inside a Niche for Ambient Illumination

A niche with LED strip lighting installed along its upper interior edge — behind a small shadow lip if the design allows — serves double duty: it provides a dedicated light zone for seeing what’s in the niche clearly and it creates a secondary ambient light source in the shower that contributes to the overall bathroom lighting at a height where overhead fixtures typically don’t reach effectively.
The visual effect of an illuminated niche under warm LED light is genuinely atmospheric — the light pools into the recess and creates a glow that references the quality of boutique hotel bathrooms rather than standard residential showers. LED strips rated for wet-area use are available and should be specified for any niche in a shower environment; standard interior LED strips are not rated for the moisture exposure a shower niche experiences. The electrical work should be completed during the framing stage, with conduit run to the niche location before backer board is installed, since retrofitting lighting into a completed tiled niche requires opening the wall.
13. Create a Wide Niche With a Dividing Shelf to Separate Sections

A niche that spans the full usable width between two studs — typically around 14 inches — with a horizontal dividing shelf added at mid-height creates two distinct storage sections in the same wall opening. The upper section can hold taller items; the lower section is reserved for shorter ones. This configuration maximizes the storage capacity of a single niche opening without requiring a second niche location.
The dividing shelf can be tiled to match the niche interior, a glass insert, or a solid surface strip — the material choice affects both the shelf’s visual weight and its maintenance requirements. A tiled shelf is the most durable and lowest maintenance; a glass shelf is the most visually open; a solid stone or marble strip is the most materially interesting. The shelf position within the niche height should be determined before tile is set, since the shelf support structure needs to be in place during installation rather than retrofitted.
14. Build a Niche Into the Vanity Wall for Toiletry Display

Niches don’t belong exclusively to the shower. A recessed niche in the wall beside or above the bathroom vanity — in the drywall rather than a wet area — creates a display zone for toiletries, candles, small plants, or decorative objects without any of the waterproofing complexity of a shower niche. This niche type is finished with standard drywall compound and paint rather than tile, which makes it a simpler DIY project for those comfortable with basic wall work.
The vanity niche suits the object categories that don’t fit naturally in a medicine cabinet or under-sink storage: the diffuser, the candle, the perfume bottles that are visually interesting enough to display, the small plant that needs to be seen from the bathroom’s entrance. Positioning the niche at eye level beside the mirror, or above the toilet if the bathroom layout places the toilet wall as the primary visual target, puts the displayed objects at a height where they’re genuinely visible rather than hidden at counter level.
15. Use a Niche Above the Toilet for Practical Wall Storage

The wall directly above the toilet is one of the most consistently underused storage zones in any bathroom. A niche built into this wall — one that doesn’t require waterproofing since it’s well outside any water zone — provides space for folded hand towels, extra toilet paper rolls, a small plant, or decorative objects without a shelf bracket or a piece of furniture that competes for floor space in what is typically the bathroom’s most constrained area.
The height of this niche should place the bottom of the opening above the toilet tank lid — typically starting no lower than about 30 inches above the toilet seat height — so the niche is accessible without obstruction. A niche finished with drywall and paint can be made to look like an intentional architectural detail rather than a DIY project if the proportions are right and the opening has clean, consistent reveals. A contrasting paint color inside the niche versus the surrounding wall color adds definition and makes the contents visible at a glance.
16. Tile the Niche Surround in a Contrasting Material for a Framed Effect

Where the niche interior is tiled in an accent material (idea 6), the niche surround — the visible border between the niche opening and the surrounding wall — offers its own design opportunity. A surround tile or trim piece in a material distinct from both the wall tile and the niche interior tile creates a three-layer composition: wall, frame, niche. Metal trim strips in brushed brass, matte black, or stainless steel are the most commonly specified surround treatment for contemporary bathrooms; they provide a clean, precise edge and a material that’s visually coherent with the hardware elsewhere in the bathroom.
The metal trim finish should match or closely relate to the other hardware in the bathroom — faucets, towel bars, shower fixtures — for the kind of finish cohesion that makes a bathroom read as designed rather than assembled. A matte black trim surround around a white-tiled niche in a bathroom with matte black fixtures reads as intentional; the same black trim in a bathroom with chrome fixtures introduces a competing finish.
17. Install a Niche at the Side of a Freestanding Bathtub

Freestanding tubs positioned against a wall create a natural alcove on one or both sides that can accommodate a niche in the adjacent wall. A bath-side niche at approximately the tub deck height — positioned so that a bather lying in the tub can reach it comfortably — provides the same storage function for bath-time products that a shower niche provides in the shower, without requiring a separate shelf or caddy beside the tub.
The products that typically occupy this niche are different from shower products: bath salts, a single candle, a hand towel, perhaps a book or a glass. The niche can afford to be slightly shallower than a shower niche since bath products tend to be stored in smaller, lower-profile containers. Because this niche is adjacent to but not inside the wet zone of the tub, it needs only a water-resistant finish rather than full shower-rated waterproofing — though any surface adjacent to a bathtub benefits from a tile or stone finish rather than painted drywall.
18. Use Two Side-by-Side Niches to Define a Symmetrical Focal Wall

Two niches placed symmetrically on either side of a central element — a window in the shower, a linear drain stripe, a vertical tile pattern — create a composed, balanced focal point in the shower wall that reads as deliberate architectural detail rather than pragmatic storage. The symmetry itself communicates intention, which is part of why this arrangement photographs well and consistently appears in high-end bathroom design.
The two niches should be identical in size, at the same height, and separated by a consistent and proportional gap — one that relates to the width of the central element between them rather than being arbitrary. Their tile treatment can match each other exactly for a unified look, or they can share the same surrounding tile while using a common accent on both interiors, reinforcing the symmetry through material as well as form.
19. Add a Foot Niche at Low Height for Shaving and Practical Rinsing

A foot niche — a small, low-positioned niche built into the shower wall at approximately knee height, typically 12 to 18 inches from the shower floor — provides a stable, wall-integrated platform for resting one foot while shaving. The practical benefit is significant in showers where there’s no built-in bench: a safe, flat surface at the right height reduces the instability of balancing on one foot and reaching across the shower body.
The foot niche is shallower than a standard storage niche — around 10 to 12 inches depth is sufficient — and can double as storage for a razor, a loofah, or a bar of soap. Because it’s positioned low on the wall and outside the primary spray zone if the showerhead is positioned higher on the opposite or adjacent wall, it typically experiences less water exposure than a chest-height niche. Tile the interior to match the shower floor tile rather than the wall tile for visual continuity with the floor plane.
20. Extend the Niche Across the Full Shower Width for Maximum Storage and Visual Impact
A full-width niche — one that extends the entire width of the shower from wall to wall — is the most architecturally integrated form of shower storage available. Rather than a contained box within the tile, the full-width niche reads as a defined horizontal zone of the shower, a physical layer within the wall at a specific height that accommodates everything the shower requires in one organized, unified band.
This configuration is typically planned at a single shelf height midway up the shower wall, and the niche depth matches whatever the wall framing allows. Because this niche spans full width, it almost always requires cutting through at least one intermediate stud, which means a structural header must be installed above the opening — work that requires a contractor familiar with load-bearing and non-load-bearing wall distinctions and local building code requirements. The visual payoff — a clean, hotel-shower-quality horizontal storage band — justifies the planning and construction complexity for bathrooms undergoing full renovation.
What to Decide Before Any Niche Is Built
The decisions made before a tile is set determine whether a bathroom niche works well for years or creates problems that require opening the wall to fix.
Confirm the wall is interior. Exterior walls create moisture and insulation problems in most U.S. climate zones. Verify the wall is interior before any planning proceeds.
Find the studs. Standard stud bays are 16 inches on center, which limits the maximum niche width to approximately 14.5 inches without framing modifications. Wider niches require cutting and re-heading a stud, which is a structural intervention that should be assessed by a professional.
Waterproof completely. A correctly built shower niche is fully waterproofed — backer board, membrane, and sealed grout — not just tiled. The niche floor slope ensures drainage. Any shortcut in the waterproofing becomes a leak pathway behind the wall.
Plan tile layout around the niche. Decide where the niche goes before selecting tile, and calculate how tile courses will land relative to the niche edges. Full tiles around all four sides of the niche opening look intentional; cut tiles at the niche edges look unplanned.
Specify depth against real products. Measure the tallest pump bottle or product container that will live in the niche before confirming the niche depth. A niche too shallow for the actual products is a permanent inconvenience.
Final Thoughts
A well-planned bathroom niche does something that almost no other bathroom addition can: it adds storage, improves function, and makes the room look more considered — all without consuming any of the floor space that bathrooms are perpetually short of. The investment in planning is genuinely small relative to the disruption of reopening a tiled wall to fix a mistake, which makes getting the location, depth, waterproofing, and tile alignment right before a single tile is set the most useful guidance in this article.
Start with the location decision — interior wall, correct height for your reach, away from the direct showerhead spray — and work outward from there to tile choice, niche size, and any additional features like lighting or a dividing shelf. The ideas here span the full range from a single standard niche to full-width storage bands and vanity wall display niches, and the best choice is always the one calibrated to how the bathroom actually gets used.
Save the ideas that suit your bathroom’s tile scheme and layout, and return to this guide when the planning conversations with your contractor begin.