25 Kitchen Drawer Organization Ideas You’ll Actually Use
Most kitchen drawers get organized once, look perfect for about a week, and gradually drift back to exactly what they were. The reason usually isn’t a lack of effort — it’s that the system chosen doesn’t match how that drawer actually gets used. A beautiful bamboo insert in the wrong drawer, organizers that are slightly too small so things slide behind them, or a setup that requires putting things away more carefully than anyone does at 7pm after dinner — all of these produce tidy-for-a-day results rather than tidy-for-good ones.
The ideas here are organized around the specific types of drawers, contents, and challenges that appear in most kitchens. Each one includes enough detail about sizing, materials, or sequencing that you can apply it to your actual kitchen rather than the idealized version in a product photo. Before reading further: measure the interior width, depth, and height of the drawers you’re planning to organize before buying anything. Exterior cabinet dimensions tell you very little about what fits inside, and the most common mistake in kitchen organization is buying organizers before measuring.
1. Empty the Drawer Completely Before Deciding on Any System

The most consequential step in organizing any kitchen drawer is the one that happens before any organizer is purchased: taking everything out, evaluating what’s actually in there, and removing anything that doesn’t belong. Every drawer in most kitchens contains at least a few items that arrived there accidentally, haven’t been touched in years, or would work better somewhere else.
This edit-first principle matters because the organization system you need depends entirely on what stays after the edit, not on what’s currently in the drawer. Buying organizers for a drawer’s current contents often means buying storage for things you’re about to discard. Empty the drawer onto the counter, group what remains into categories, estimate the volume of each category, and then choose an organizer sized to what stays rather than what was. Every step after this becomes more straightforward.
2. Measure Interior Drawer Dimensions Before Buying Any Organizer
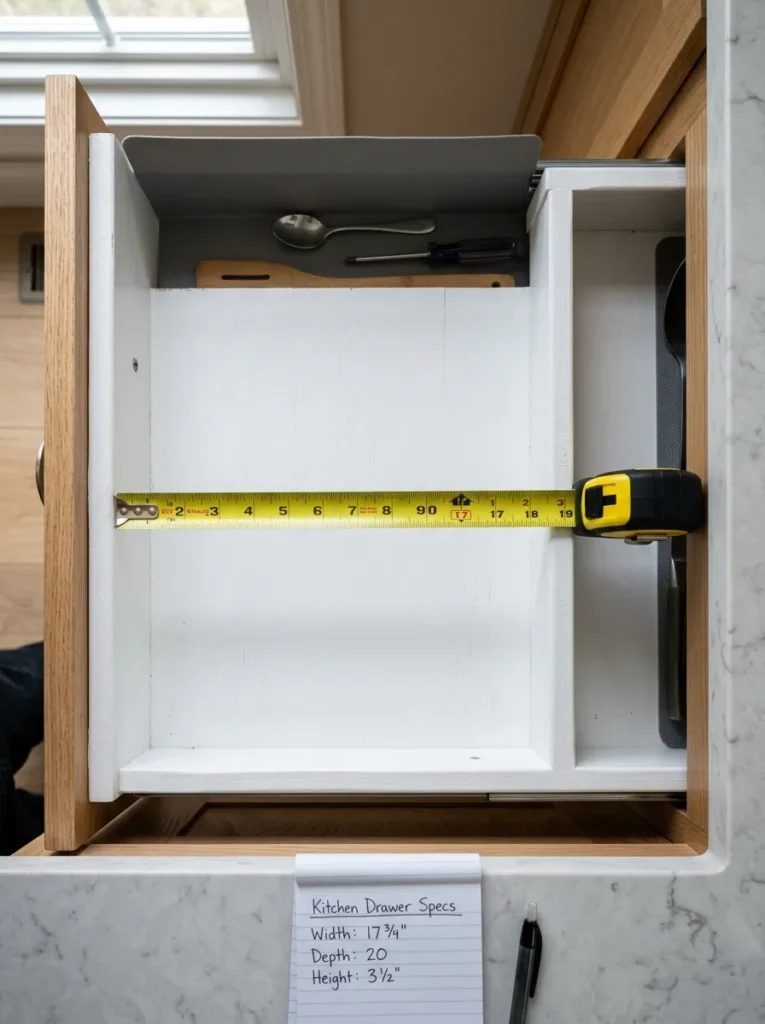
Interior drawer dimensions — the actual usable space inside the drawer box — routinely differ from the exterior cabinet measurements by two to three inches in both width and depth. The drawer slides, the interior walls, and the front panel all eat into the available space. An organizer that appears to be the right size based on the exterior can be an inch too wide and physically won’t fit, or two inches too short and leaves a gap at the back that immediately becomes a collection zone for small items.
Before purchasing anything, measure the interior width from inside wall to inside wall, the interior depth from the back of the front panel to the back wall, and the interior height from the drawer floor to the underside of the cabinet above when the drawer is fully open. The height measurement is especially important for stackable inserts — a product that stacks beautifully in a photo may not fit under the upper cabinet when the drawer is open in your specific kitchen.
3. Organize by Frequency of Use, Not Just by Category

The standard approach to kitchen drawer organization assigns every category of item its own drawer — utensils here, tools there, linens in another — without accounting for how often each category is actually used. The result is frequently used items sharing space with rarely used ones, which means reaching past the lemon zester every time you need a spatula.
A more functional sequence: dedicate the most accessible drawers — the ones directly adjacent to your primary prep zone and cooktop — to the items you use every single day. Daily-use utensils, the knife you cook with most, and the measuring spoons you reach for constantly belong in the easiest-to-open drawers at the most natural height. Items used weekly — baking tools, specialty equipment, extra serving pieces — go in secondary drawers slightly further from the primary cooking zone. The system works with your actual habits rather than against them.
4. Use Adjustable Bamboo Dividers for Everyday Utensil Drawers

Adjustable bamboo drawer dividers — the kind with spring-loaded or notched ends that press against the interior walls without screws or adhesive — are the most versatile organizer for standard utensil drawers. Unlike fixed inserts sized to standard dimensions, adjustable dividers accommodate the actual interior width of the drawer and can be repositioned as the drawer’s contents change.
Bamboo is worth choosing over plastic for utensil drawers: it doesn’t slide as readily, doesn’t show scratches the way cheaper plastic does, looks visually consistent when multiple dividers are used in the same drawer, and holds up well to the incidental moisture and heat exposure that kitchen drawers experience. Set the dividers to create sections sized to each utensil category — a wider section for large spoons and spatulas, narrower ones for whisks and tongs — rather than dividing the drawer into equal thirds regardless of what fits.
5. Keep the Utensil Drawer to One Layer of Items

The utensil drawer that doesn’t work is almost always one that’s been overfilled to the point where you can’t see or reach what’s at the bottom without lifting everything above it. One layer of items — everything visible from above without any stacking — is the standard that makes a utensil drawer genuinely functional rather than technically organized.
If a single layer doesn’t accommodate all the utensils currently in the drawer, the first response should be editing rather than adding a second tier. Two or three spatulas of different materials serve the same function; the cooking tongs that you use versus the pair that came with a grill set you no longer own — these are the decisions that produce a drawer you can actually use rather than one that stores everything that’s accumulated. If two tiers are genuinely needed after editing, stackable utensil inserts that hold the top layer elevated enough to see underneath work better than simply piling items.
6. Add a Dedicated Drawer for Frequently Used Small Tools

In many kitchens, frequently used small tools — a vegetable peeler, a can opener, kitchen shears, a box grater, a melon baller, a citrus reamer — share a general utensil drawer with spatulas and spoons, where they settle to the bottom of the pile and are effectively invisible. A dedicated small-tools drawer with a custom-width insert divided into individual slots makes every one of those tools visible and reachable in a single gesture.
This drawer works best immediately beside the primary prep area — the zone where cutting boards live and prep work happens — since that’s where most small tools are used. A 12-to-15-inch wide drawer with an insert divided into ten to fourteen individual slots accommodates most small tool collections. The visual effect of a small-tools drawer organized this way is one of the most satisfying in kitchen organization: everything is identifiable, nothing is buried, and replacing each tool after use takes the same amount of effort as pulling it out.
7. Store Knives in a Drawer-Fitted Knife Block or Slotted Insert

Loose knives in a drawer are a safety problem before they’re an organization one. Reaching into a drawer where blades are exposed causes cuts, and the repeated contact between blades and other drawer contents dulls edges more quickly than almost any other storage method.
A fitted in-drawer knife block — a block of wooden slots sized to specific blade lengths, designed to lie flat in the drawer with knife handles facing forward — solves both problems simultaneously. The blades are protected and protected from contact with other surfaces; the handles are visible and accessible without reaching into the drawer blindly. Sized correctly, an in-drawer knife block can accommodate six to twelve knives in a single standard-width drawer. The alternative for smaller knife collections is a knife-specific slotted insert with angled slots that position the handles toward the front of the drawer.
8. Use a Tiered Expandable Insert for Measuring Spoons and Cups

Measuring spoons and measuring cups are among the most organizationally annoying items in any kitchen: small enough to get buried, used together by set but stored separately by most organizers, and infuriating to retrieve quickly when a recipe is running. A tiered expandable insert with individual slots for each piece — spoons nested by size in ascending order, cups similarly organized — makes finding the quarter teaspoon versus the teaspoon a one-second task rather than a minute-long search.
The expandable versions of these inserts are particularly useful because they adjust to the interior width of the actual drawer rather than requiring an exact size match. A tiered approach keeps the spoon sets and cup sets separated so the rubber bands or rings holding them together aren’t necessary — the insert does the grouping. This one drawer change alone has an outsized effect on how smoothly meal prep runs in everyday cooking.
9. Dedicate One Narrow Drawer Entirely to Flatware
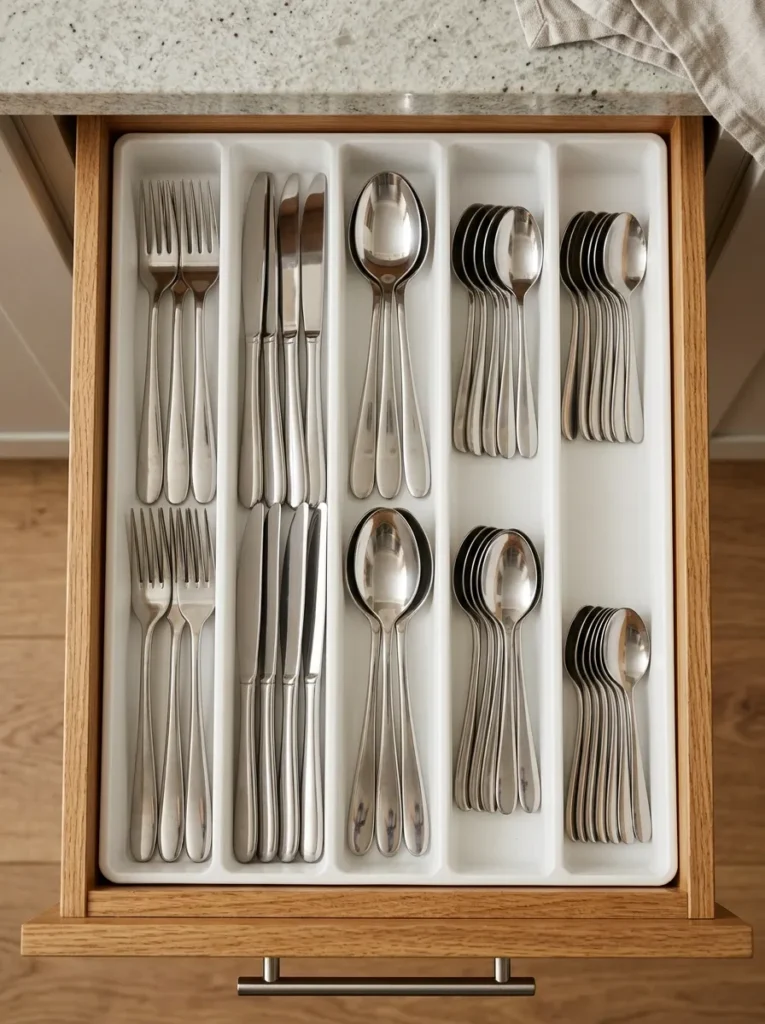
A flatware drawer organized well is one of the simplest and most satisfying kitchen organization projects available. A fitted flatware tray — sized accurately to the drawer’s interior dimensions — with slots for forks, knives, spoons, and teaspoons, replaces the shifting pile of silverware that most flatware drawers become.
The tray material determines how long the organization lasts. A tray in a material that’s too light slides forward in the drawer every time it’s opened, dumping silverware toward the front and leaving the back slots empty. A weighted tray or one with a non-slip base coating stays put. Measure the interior before purchasing: most flatware trays are sized to approximate standard drawer widths rather than exact interior dimensions, and the gap between the tray and the interior wall becomes where spoons gather and disappear. A tray with a small secondary compartment for extras or specialty pieces integrates the overflow without a separate organizer.
10. Lay Spice Jars Flat in a Deep Drawer With a Label-Up System

A spice drawer — where spice jars lie on their sides with labels facing upward — is one of the most functionally superior alternatives to a spice rack for anyone with a deep enough drawer to accommodate it. The label-up orientation means every spice is identifiable from above without picking up a single jar; the flat position makes the drawer a more stable storage environment than a cabinet shelf where jars topple.
The drawer needs to be deep enough — front to back — to accommodate the length of a standard spice jar lying flat, which is typically around 4 to 5 inches. The organizing approach: group spices by type (baking spices together, savory herbs together, whole spices together) and arrange each group alphabetically within its section. A drawer liner underneath prevents jars from rolling. The practical limitation worth knowing: this system works best with uniformly sized jars. A drawer mixing different jar heights and lengths requires more dividers to keep groups organized and makes the visual effect less clean.
11. Store Cooking Oils and Vinegars Upright in a Deep Pull-Out Drawer

Tall bottles — cooking oils, vinegars, soy sauce, fish sauce, hot sauces — are notoriously difficult to store in standard cabinet shelves where they’re blocked by shorter items in front and tend to fall. A deep pull-out drawer at base cabinet height, organized with a non-slip drawer liner and bottles stood upright in a consistent arrangement, makes the full collection visible and accessible from above with a single pull.
Group by type: oils together, acid ingredients (vinegars, citrus juices) together, condiments and flavor additions separately. The non-slip liner is essential — bottles on a smooth drawer bottom shift every time the drawer is opened and eventually topple. A liner with individual ring recesses sized to the bottles is more secure than a flat textured liner but less flexible when the collection changes. This approach works particularly well in kitchens where counter space is limited, since keeping bottles in a drawer rather than on the counter frees significant prep surface area.
12. Create a Dedicated Baking Drawer With Everything Baking Needs

The challenge with baking equipment is that it’s used intermittently rather than daily, and when it’s needed it tends to be needed all at once — during a specific baking session where locating each piece separately adds significant friction. Grouping all baking-specific tools in one dedicated drawer — measuring spoons and cups, a pastry brush, a bench scraper, a rolling pin if it fits, a cookie scoop, a pastry cutter — eliminates the search phase entirely.
A drawer with a custom insert divided into sections sized to the actual baking tools is the most effective approach. The insert doesn’t need to be elaborate: a combination of adjustable bamboo dividers and a small tray for the smallest items works well. The rolling pin is the item most likely to require its own solution — a specific horizontal divider at the back of the drawer, or a dedicated sleeve mount on the inside of the drawer, keeps it from rolling and taking up the full drawer depth.
13. Use Stackable Bins in Deep Drawers to Maximize Vertical Space

Standard deep drawers — those 8 to 12 inches from floor to drawer top — are designed to hold more than a single layer of items but typically get used as one very deep pile. Stackable bins or two-tier inserts take the full available height and create two distinct storage zones: a lower zone for less frequently needed items and an accessible upper zone for everyday use.
This approach works particularly well for the pantry-style storage that some kitchens assign to base drawers: snack bags, plastic storage lids, extra dish towels, and food storage containers all benefit from the two-tier approach. The lower bin should not be so deep that retrieving items from it requires fully removing the upper tier — accessible means accessible without a production. A lower bin that’s 4 to 5 inches deep and an upper tray that fits over it at a comfortable reaching height gives both zones genuine usability.
14. Manage Pot Lids With Tension Rods or a Vertical Divider

Pot lids are one of the most consistently aggravating storage problems in any kitchen. In a drawer, they slide and stack in ways that make retrieving the right lid require a minor excavation. Two solutions work well and serve different drawer sizes.
Tension rods — the small spring-loaded rods used for curtains — placed parallel across a wide shallow drawer at intervals sized to the lid diameters hold lids upright and individually accessible. The rods cost almost nothing and require no installation beyond the spring tension against the drawer walls. This works best in a wider, shallower drawer where lids can stand vertically without exceeding the drawer height. For deeper drawers, a vertical divider insert — a row of individual slots like a file organizer — holds lids in their own vertical slots and makes pulling the correct one a one-hand task.
15. Organize Plastic Container Lids and Bottoms Separately in the Same Drawer
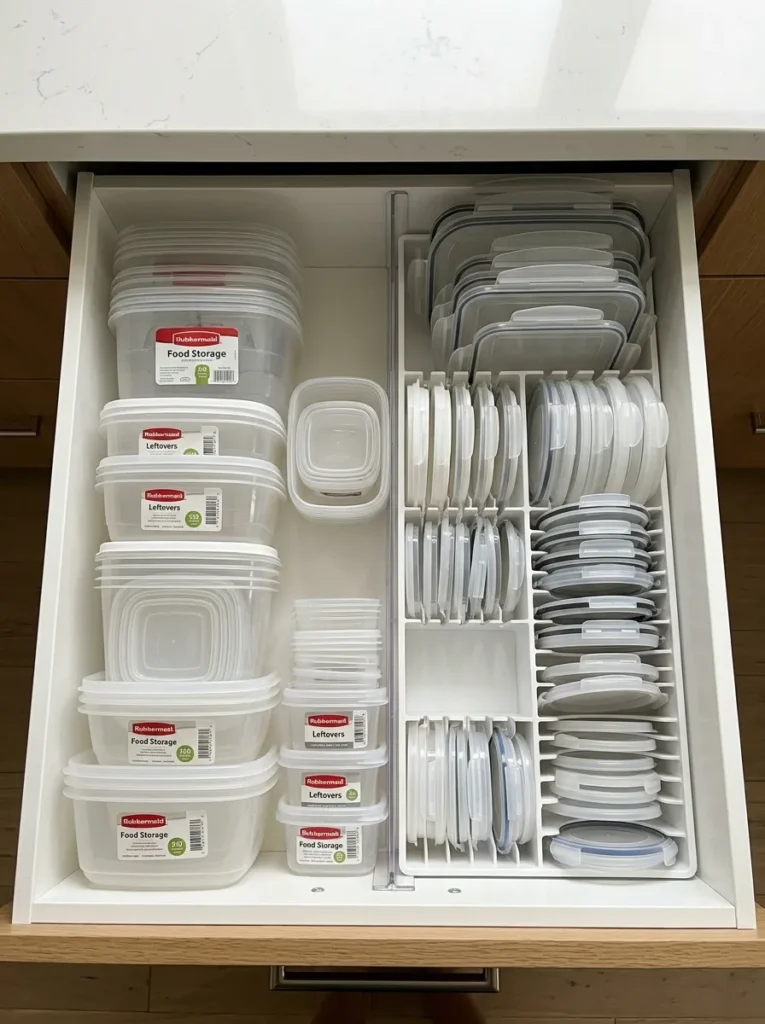
The plastic food storage container drawer problem is almost universal: an unpaired accumulation of lids and containers that requires matching each pair before use, with the ratio of lids to containers invariably being wrong in one direction or another. A two-zone approach in a single deep drawer — containers nested by size on one side, corresponding lids sorted vertically in a divider on the other — solves both the matching problem and the nesting problem simultaneously.
Containers nest inside each other by size with the smallest inside the largest; lids stand vertically in a divider or bin sorted by approximate size from smallest to largest. Before setting up this system, discard every lid without a matching container and every container without a matching lid. The orphan collection almost always accounts for a third to half of the drawer’s contents, and removing it before organizing is the step that makes the two-zone system actually fit.
16. Fold and Store Kitchen Linens Vertically Like Files Rather Than in Stacks

Kitchen towels, cloth napkins, and dish cloths stored in flat stacks are only accessible from the top — pulling one from the bottom of a stack requires lifting everything above it, and the folded edges that face up tell you nothing about which one is which. Folded vertically and stored standing in a drawer like files, every item is equally accessible, visible from above, and retrievable without disturbing the others.
The fold matters: each towel or cloth should be folded to a consistent width that fits the drawer from front to back and a consistent height that stands upright without flopping. A consistent fold also means the drawer’s contents look intentional from above — even a drawer of mixed tea towels and cloth napkins reads as organized when the folding is consistent. A simple drawer divider separates towels from napkins without requiring a separate drawer for each.
17. Line Every Drawer With a Non-Slip Liner Before Adding Any Organizer

Drawer liners serve a function that’s easy to undervalue: they prevent organizers and their contents from shifting. An insert that fits the drawer perfectly when everything is carefully placed will gradually migrate toward the front of the drawer with every open-close cycle unless the surface beneath it provides friction. Contents that reach the front panel and start pressing against it create the gradual disorder that makes an organized drawer revert to chaos.
A non-slip liner cut to the drawer’s interior dimensions — slightly smaller than the exact measurement so it lies flat without buckling at the edges — provides the friction that keeps everything in position. Cork, rubberized fabric, and foam-backed vinyl are all functional; smooth plastic shelf liner is the one material that doesn’t provide enough friction to justify its use under kitchen organizers. The liner can be cut with scissors and requires no adhesive, which makes replacement straightforward when it wears.
18. Mount a Narrow Under-Cabinet Drawer for Wraps and Foils

In kitchens where drawer space is genuinely limited, the space directly beneath base cabinets — the toe-kick zone between the bottom of the cabinet and the floor — can be converted to shallow pull-out drawers for flat items that don’t need depth: aluminum foil, plastic wrap, parchment paper, zip-lock bag boxes, and similar pantry staples. Toe-kick drawers require specific hardware and a measure of DIY confidence or a carpenter, but in small kitchens they reclaim significant square footage of storage without any visible addition to the kitchen’s footprint.
For those who’d rather not install new drawers, the wall-mounted organizer that holds wrap boxes inside a cabinet door, combined with a standard shallow drawer for the boxes’ contents, solves the same problem without construction. The key is getting the wraps and foils out of whichever drawer they currently occupy and giving them a dedicated home where the awkward long boxes don’t take up space proportioned for smaller items.
19. Add a Drawer Specifically for Snacks and Packaged Foods

In households with children, or in kitchens where counter space is limited and pantry space is awkward to access, a dedicated snack drawer in a lower base cabinet creates an immediately accessible, self-contained snack storage zone. Individual bins within the drawer — one for bars and packaged snacks, one for nuts and dried fruit, one for crackers, one for bags — make the contents visible without fully opening the drawer.
Clear bins are worth using here specifically because the visibility from above tells you at a glance what needs restocking. The bin sizes should be proportioned to the actual snack packaging rather than equal-sized — granola bars are longer and flatter than nuts, and a bin that fits one well probably doesn’t fit the other efficiently. The practical benefit beyond organization: a dedicated snack drawer limits the territory that snack-related clutter can occupy. When the drawer is full it’s full; the counter and other drawers stay clear.
20. Use Drawer Inserts With Individual Slots for Baking Spices Separately From Savory Spices

The single-drawer spice system works well until the collection grows large enough that a single drawer can’t accommodate everything. The more functional approach for well-stocked kitchens: divide the spice storage into two separate drawers by use case. Baking spices — cinnamon, nutmeg, allspice, ginger, cardamom, cream of tartar, baking powder — go in one drawer, accessed primarily during baking sessions. Savory spices, herbs, and blends — cumin, paprika, thyme, oregano, chili powder, curry powder — go in another, used during daily cooking.
This split does more than just add capacity. It reduces the search time for any specific spice significantly — a baking drawer that contains only baking spices makes finding cardamom a single glance rather than reading through a full spice collection. Within each drawer, alphabetical organization remains the most useful ordering principle for everyday speed.
21. Dedicate One Drawer to Batteries, Chargers, and Small Electronics
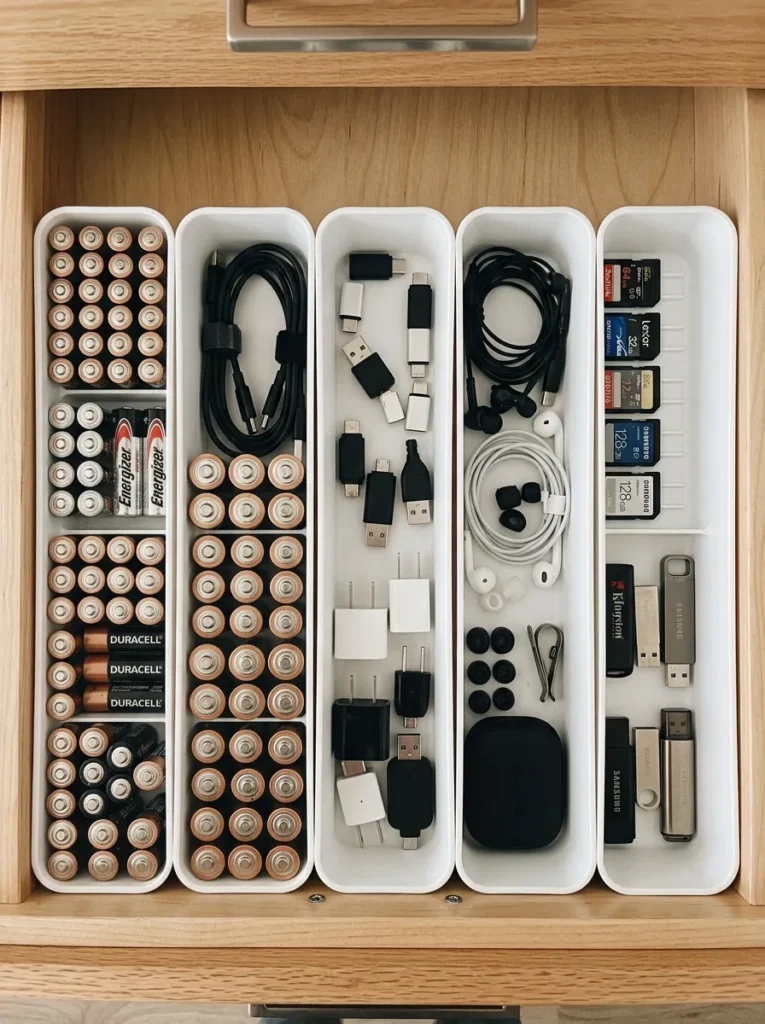
The kitchen junk drawer works as a concept — a catch-all for items without a defined home — but fails in practice when it becomes the storage location for batteries, charging cables, spare earbuds, USB drives, and similar small electronics alongside rubber bands, pens, and tape. The electronics category alone contains enough items to warrant its own organizational logic.
A drawer with small individual bins — one for batteries sorted by size, one for charging cables coiled and held with a velcro tie, one for adapters, one for earbuds or small accessories — keeps this category genuinely organized rather than theoretically stored. The batteries-sorted-by-size bin is the detail that matters most here: a bin of mixed AA, AAA, C, D, and 9V batteries requires reading each one to find the right type. Separate small bins for each type makes battery replacement a ten-second task.
22. Transform the Junk Drawer With Consistent Small Bins
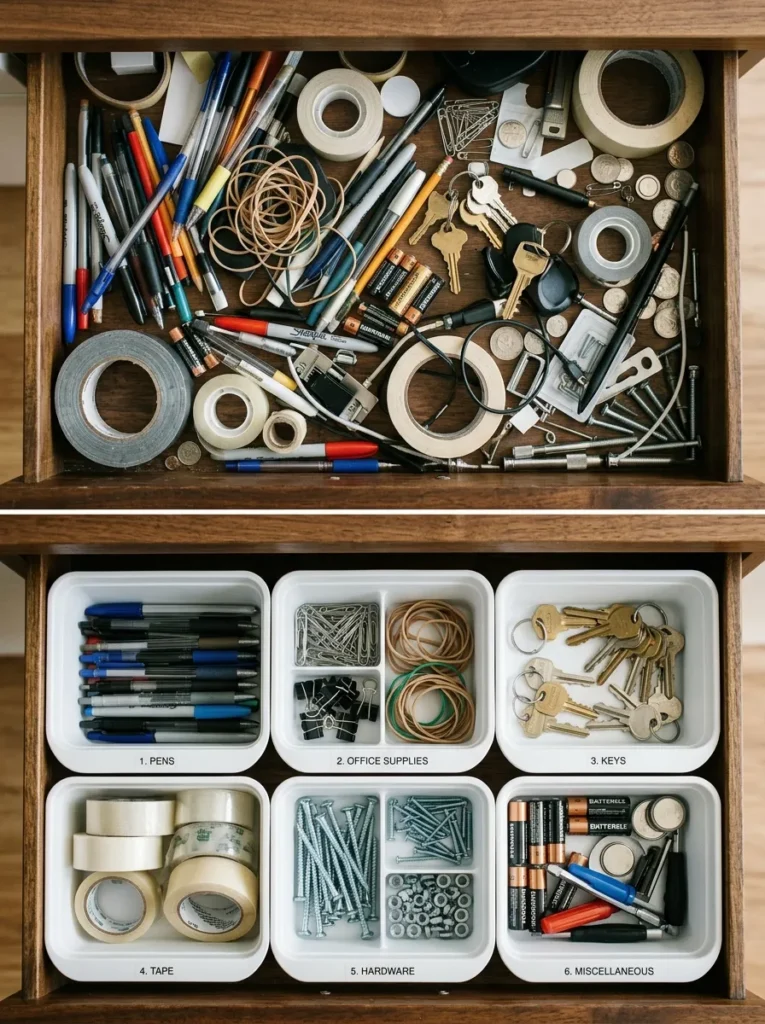
The junk drawer doesn’t need to be eliminated. Most households genuinely need a place for pens, scissors, tape, rubber bands, spare keys, birthday candles, and the category of items that has no better home. The problem isn’t the concept — it’s the absence of any internal structure that lets the drawer fulfill its role without becoming unusable.
Consistent small bins — five or six in the same material and finish, each assigned to one category of junk-drawer content — give the drawer the internal organization it needs without turning it into something it isn’t. A bin for writing tools, a bin for office supplies, a bin for keys and small hardware, a bin for tape and adhesives, a bin for miscellaneous. The categories can be loose; the bins shouldn’t be. A junk drawer organized with consistent bins is one you can navigate in five seconds rather than two minutes.
23. Install a Cutlery Drawer Directly Beside the Dishwasher

This is a placement recommendation rather than an organizer recommendation, but placement has more impact on daily kitchen function than any insert. When the cutlery drawer is located directly beside the dishwasher, unloading silverware after a cycle becomes a single transfer motion rather than carrying items across the kitchen to their storage location. The small reduction in friction is significant over the course of daily dish cycles.
If the current cutlery drawer is across the kitchen from the dishwasher, it’s worth asking whether any of the cabinets adjacent to the dishwasher have an underused drawer that could be reassigned to flatware. The contents of the original drawer get a new home; the new cutlery drawer gets a properly fitted tray; and the daily unloading routine becomes noticeably easier. Zoning storage around the workflow that uses it is the organizing principle underlying this idea and several others in this article.
24. Use a Pegboard Insert for Maximum Customization in a Deep Drawer
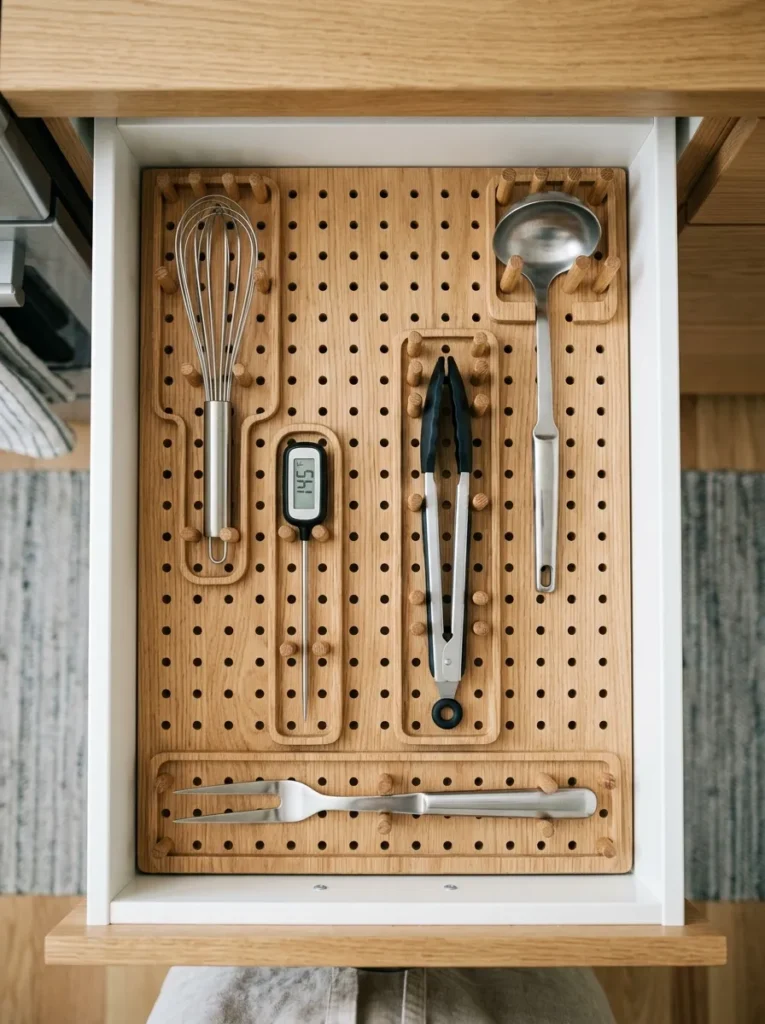
A pegboard drawer insert — a board with a grid of holes fitted to the drawer floor, into which pegs of different heights and shapes are inserted to create custom dividers — offers the most flexible organizing system available for deep kitchen drawers. Unlike fixed inserts with predetermined slot sizes, a pegboard system lets you arrange dividers to the exact shape and footprint of your specific collection.
This is worth the additional cost and setup time for drawers that hold irregularly shaped items that don’t fit standard inserts well: a drawer with whisks, ladles, a thermometer, tongs, and a meat mallet doesn’t map neatly to any standard utensil organizer. A pegboard insert configured specifically to those items holds each piece without gaps or overcrowding. The configuration can be rearranged as the drawer contents change, which means the investment doesn’t become obsolete when the kitchen collection evolves.
25. Take a Photo of Each Organized Drawer So You Can Reset It

The maintenance step that most organization systems skip: immediately after organizing each drawer, take a photograph of the result from directly above. This creates a visual reference — a “what this drawer is supposed to look like” record — that makes resetting the drawer after it drifts significantly faster than reorganizing from scratch or relying on memory.
In households with multiple family members who use the kitchen, posting the photo inside the drawer or cabinet door above it gives everyone a reference point for where things go. The photograph also reveals whether the organization system is genuinely working — if resetting the drawer to the photo requires repositioning more than two or three items, the system is probably either too complicated for daily use or needs adjustment. A system you can restore in thirty seconds is one that will actually last.
The Right Order to Tackle Kitchen Drawer Organization
For kitchens where most or all drawers need attention, sequence matters more than people expect. Starting with the most visible or most frustrating drawer gives you early momentum; working through drawers from most to least frequently used ensures that the decisions with the most daily impact get made first.
A practical sequence: start with the everyday utensil drawer since it affects every meal. Move to the flatware drawer for the same reason. Then the knife drawer, which has a safety component that upgrades the organizational priority. Then measuring tools, spice storage, and cooking-specific equipment in the order your actual cooking uses them. Linens, plastic containers, wraps, and specialty equipment drawers can come after the daily-use drawers are resolved — they affect the kitchen less frequently and their organization can be refined over time.
Give yourself one drawer per session rather than trying to address the full kitchen in a single afternoon. One drawer done thoroughly — edited, measured, correct organizer chosen, liner installed, contents returned — produces a result that’s more likely to last than six drawers organized quickly without the right materials.
Final Thoughts
A well-organized kitchen drawer does one thing: it puts the right item in your hand faster than searching for it would. That’s the entire measure of whether a system is working. The organizers, the materials, the bins and dividers and inserts are all tools in service of that single outcome — not the outcome itself.
Start with the edit before any organizer is purchased. Measure before anything is bought. Organize the drawers you use every day before the specialty ones. And take a photo when each drawer is finished so resetting it when it drifts takes thirty seconds rather than starting over.
These kitchen drawer organization ideas work best when they’re matched to your actual kitchen, your actual collection of tools, and your actual daily routine — not to an imagined perfect kitchen where every item is uniform and every drawer is optimally sized. Most kitchens have awkward dimensions, mixed containers, and a collection assembled over years. The systems here are designed for that reality rather than around it.
Save the ideas that match your specific drawers and come back to this guide drawer by drawer.